![]()
![]()
![]()
![]()
![]()
![]()
|
|
|
Paper Plate Education Activity: Altitude of the Noon Sun II
Abstract: The
altitude of the noon Sun varies by season and by location.
In this activity, students make a paper dial to demonstrate visually the
relationships between the date; the altitude of the Sun at transit; the
observer's latitude; and the altitude of Polaris. Let us say an Inuit architect
living on the Arctic Circle is designing a new igloo and a special feature she
would like is a skylight. The igloo skylight must be located so that during the
summer months the noon Sun shines directly on the house plants -- make that
igloo plants -- that grace the center of the igloo floor.
Where does she begin? The altitude of the noon Sun varies by season and by location.
Our Inuit architect can make a paper dial to demonstrate visually the
relationships between the date, the observer's latitude, the altitude of
Polaris, and the altitude of the Sun at transit.
And so can you. Common sense tells us the Sun is higher in the summer and lower in the
winter. Most people have also heard
that some parts of the world experience months of darkness or months of
daylight. These solar phenomena are
related to the sun's varying position above and below the celestial equator. Since visualizing 3D relationships, such as the celestial sphere, can be
difficult, this activity creates a 2D means for people to understand and to
predict the sun's noon position relative to the viewer.
Because of time constraints, this paper will deal only with the
construction of the teaching aid. In
practice, students should actually measure, even crudely, the altitude of the
noon Sun through part of the year. There
are additional lessons that can be supported by the construction of the dial
itself, which are not included here. Students will need a basic understanding of the celestial sphere and the
sun's changing position on the ecliptic. Required
materials are two cardboard pizza trays of different sizes or two paper plates,
a protractor, a paper fastener, scissors, a pencil, and a list of the Sun's
monthly declination. You will build the dial in two parts.
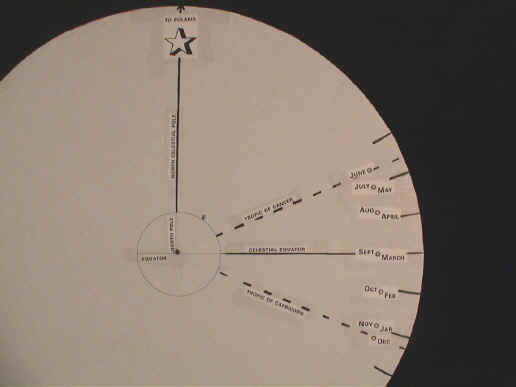
If you have a small pizza tray, use it first; if using paper plates, cut
out the flat inner circle from one plate. On
the center of the small disc draw a sphere to represent the Earth.
From its center draw perpendicular lines up and right, out to the edge of
the disc. Within the Earth, label the horizontal line the Equator;
beyond the Earth, label the horizontal line the Celestial
Equator. Within the Earth,
label the vertical line the North Pole;
beyond the Earth, label the vertical line the North Celestial Pole. Next, at the edge of the disc, mark off with the protractor every ten
degrees north and south of the celestial equator. From the center of the Earth draw a dashed line through 23 1/2 degrees
North latitude, extending it out to the edge of the disc, and label it Tropic
of Cancer. From the center of
the Earth draw a dashed line through 23 1/2 degrees South latitude, extending it
out to the edge of the disc, and label it the Tropic of Capricorn. These
lines denote the limits of the Sun above and below the celestial equator.
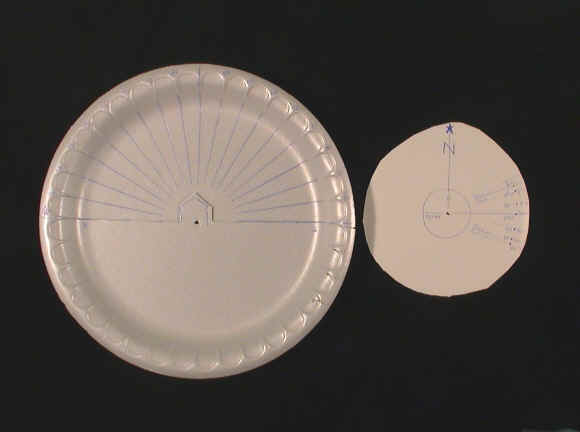
See figure 1. Refer to the table listing the sun's declination (that is, its angular
position above or below the celestial equator) for the 21st day of each month.
See Figure 2. Near the edge
of the disc, mark and label the Sun's location for each month.
The 21st days are used because they coincide with the solstices and
equinoxes. If space permits, you
may label them as well. For added reference, draw a star at the end of the north celestial pole
and label it To Polaris. Also draw a
human stick figure on the edge of the Earth near a Great Lakes latitude.
Finally, punch a small hole through the center of the Earth.
See Figure 3. Set this disc
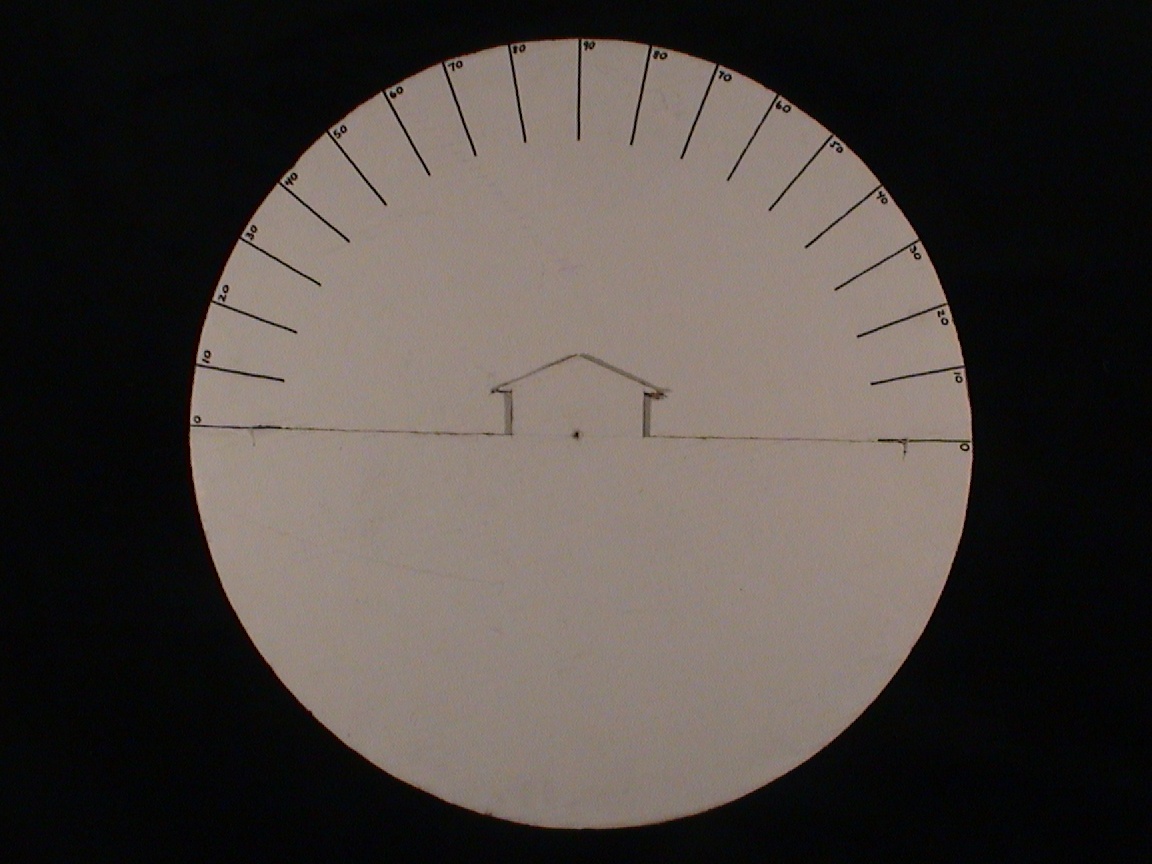
aside and work on the larger pizza tray or on the whole paper plate next. The second disc will contain a scene of the observer's local horizon.
You must disassociate yourself from the "God's-eye view" of the
smaller disc. Imagine you are
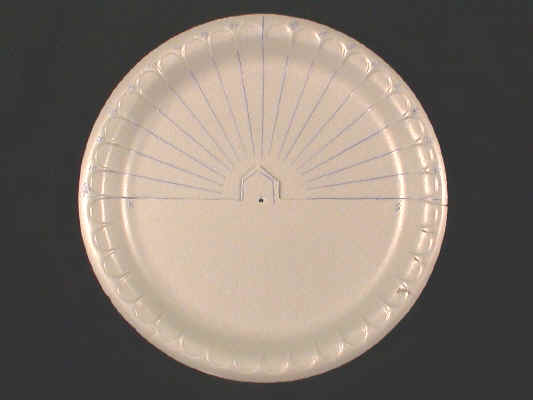
zooming in on the human stick figure. Mark the center of the large disc and punch a small hole in it.
Draw a line across the center of the disc to denote a horizon. Over the center point, draw a small house.
Next, cut a line part way along the horizon and above
the house. Do
not cut the horizon line under the house itself.
Also, do not cut all the way
across the plate. Only cut enough
for the smaller disc to slip through the slit in the larger disc.
From the center point, draw lines nearly to the perimeter of the disc
every ten degrees. Label the
10-degree increments at the edge of the disc, starting with zero degrees at each
horizon up to 90 degrees overhead.
You may draw other figures on the horizon beyond the slit for
references. Under the right half of
the house, you may also label To Southern
Horizon with an arrow pointing to the right.
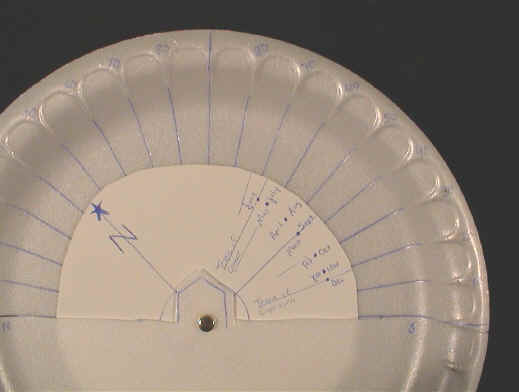
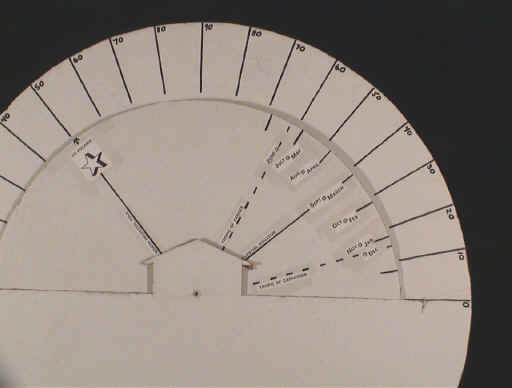
This assumes your other disc is laid out identical to Figure 3. As you face the house, you the viewer are facing east, which
may also be labeled Facing East.
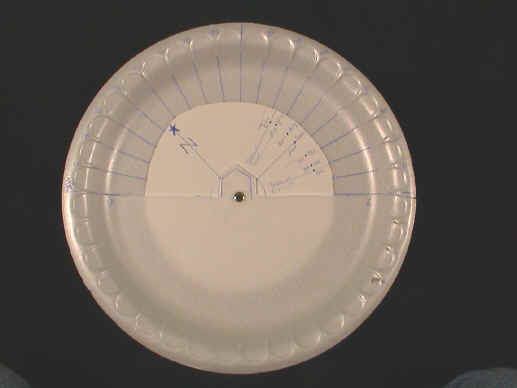
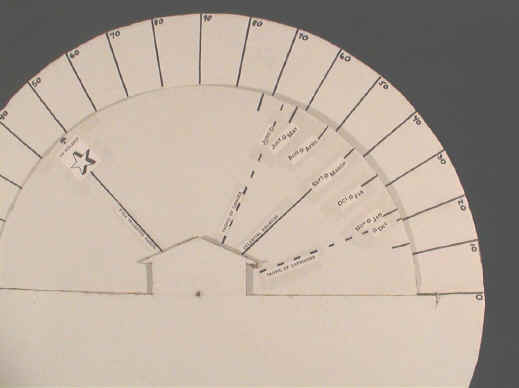
See Figure 4. Next, insert the smaller disc in the slot of the larger disc. The bottom half of the smaller disc should be under the bottom half of the larger disc. Align the center holes and secure the two discs with a long paper fastener. See Figure 5. You, and our Inuit friend, are now ready to use your paper dial. As mentioned earlier, other lessons support this activity.
This paper assumes you know that the altitude of Polaris, the North Star,
is the same as the observer's latitude. Therefore,
align Polaris on the inner dial with your latitude in degrees on the left side
of the outer dial. On the right
side you can now determine the altitude of the noon Sun above the southern
horizon throughout the year. It's
that simple. Repeat these steps for different latitudes.
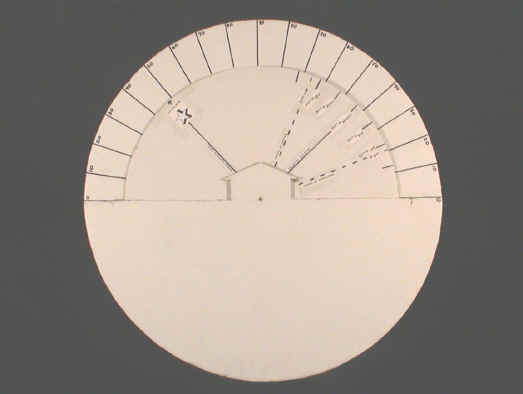
In particular, notice the Sun's annual positions for observers at the
North Pole, at the equator, at the Tropic of Cancer, and at the Arctic Circle.
It is at these locations that the dial is most revealing.
Your dial can support other activities.
For example, our architect friend could use the dial to determine how far
out an awning must extend to block direct sunlight from entering her Florida
home in the winter. And what about
the notion of no sunlight for months at a time?
From the dial, can you figure out where that occurs?
I bet our Inuit architect can now.
Contributed by Chuck Bueter. Reprinted from GLPA Proceedings, 1995, pp. 44-46. [Note: This activity is included in the Paper Plate Astronomy video/DVD/streaming video.] |
|
Copyright ©2012 Chuck Bueter. All rights reserved. |

.jpg)