|
Paper Plate Education
"Serving the Universe on a Paper
Plate"
Activity: Paper Plate Planet Pointer for
Portable Planetariums (P6)
Abstract: In this activity,
portable planetarium users make an inexpensive, hand-held device that transfers the two-dimensional drawing of the
planets in orbit around the sun to a projection of solar system objects in the
planetarium sky.
Recommended materials are a
Mini Maglite® flashlight, a Chinet® paper bowl, a thick paper plate, a large
pin or tack, a pencil, and an illustration or tables indicating the position of
the planets or moon for the desired dates.
Turn over the bowl and on its
bottom draw the planets in small orbits around the sun. Their respective positions can be found in Sky & Telescope magazine, for example, or you can use right
ascension tables for more advanced lesson plans.
I prefer to mark out 24 hours
of right ascension on the bowl’s rim first.
I draw the earth near the center of the bowl and mark nearby the location
of the sun from the right ascension tables.
Finally, I draw orbits around the sun and place the remaining planets in
mid-month positions.
From the
earth draw
a line through each of the planets and the sun and extend the lines down
the outer sides of the bowl.
Midway down the bowl's side,
punch a hole on each line to denote the respective planets. I use a pin for planets and enlarge it only slightly with a
sharp pencil. For the sun and moon,
I enlarge the hole additionally with the taper of the pencil.
In the middle of the plate,
cut an “X” so that the flashlight handle will snugly fit through the plate.
Place the upside down bowl on the upright paper plate and tape them
together, preferably so the earth is centered over the plate’s hole.
Your P6 is ready
for use.
In the planetarium, remove the head of the Mini Maglite®
so the illuminated light bulb is exposed and insert the flashlight up through
the bottom of the paper plate. Use
caution and keep the tip from contacting the
paper, for the exposed halogen bulb is fragile.
You should now be holding the handle of the upright flashlight topped by
a paper plate with an inverted bowl on it.
Align the device so that the P6
sun projection corresponds with the actual sun's position for the given time.
As you hold the flashlight, the paper plate should be in the plane of the
ecliptic. The projected planets, moon and sun will appear in their
respective positions.
The sun serves as a
time indicator (note: avoid using the word
"clock," for the audience then visualizes a 12-hour face).
Because there is no horizon cut-off, the sun projection will remain
illuminated when it is below the horizon. If
you know the sunrise and sunset time for that day, you can interpolate to get
the times between the sun’s horizon position and its noon or its midnight
position. With the diurnal motor on, you can demonstrate the rising and setting
of the planets, moon, and sun.
A key feature of the
P6 is that the instructor can readily refer back and forth
between the familiar planar position of the planets in orbit around the sun and
the position of the planets as seen from earth.
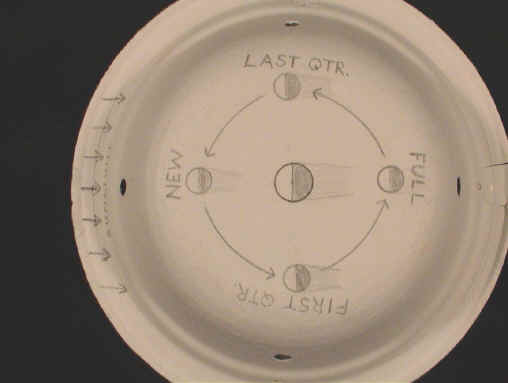
As a variation on this theme,
one can make a moon projector to show the relative positions of the sun and the
moon through the four primary phases. A
hole punch yields clean, circular moons and sun.
Place black tape over half of the hole to project quarter moons.
Contributed by Chuck Bueter.
GLPA Proceedings, 1998, p. 155.
|